You ask a coding agent to fix a bug.
It reads files, edits code, runs tests, gets stuck, and tries again.
The model is doing the reasoning, but something else is running the work.
Something decides which files it can read. Something exposes the shell. Something feeds test output back into the loop. Something records what happened.
That “something” is the harness.
You hear that word everywhere now.
Agent harness. Coding harness. Evaluation harness. Runtime harness.
Harnesses show up through different interfaces.
Sometimes the interface is a CLI. Sometimes it is an IDE extension, a desktop or mobile app, or an agent built into a larger product.
The surface changes. The job is the same: give the model a controlled environment for work.
The word can sound abstract, but the idea is simple.
The model is the brain. The harness is the operating system that gives it a place to work.
An LLM can reason, generate text, and choose the next step. But by itself, it does not know what it can see, what it can touch, how to recover from failures, or what should be recorded for review.
The harness provides that environment. It decides what the model can see and touch. It keeps the loop moving: observe, decide, act, observe again. It returns feedback, applies policy, records what happened, and gives humans a place to review, approve, or stop the work.
Designing and improving this layer of the stack is what people mean by harness engineering.
In a coding agent, that operating system exposes files, shell commands, diffs, tests, traces, and approval prompts.
In a support agent, it exposes tickets, customer records from the database, escalation rules, and human handoff.
Different products, same shape: the model reasons over the task, and the harness turns that reasoning into work you can observe, verify, and control.
Why harnesses matter
That distinction matters more as models get better.
It is tempting to think better models make harnesses less important. I think the opposite is happening.
Better models make more tasks worth giving to agents.
But the model is not the whole experience.
A strong model inside a weak harness can still create a bad experience. It may miss the right context, call the wrong tool, fail to recover from an error, or leave no trace for a human to inspect.
A less advanced model inside a good harness can often get further than you think. The harness can narrow the task, provide the right files, constrain tools, feed back failures, and verify the result outside the model.
That is why the harness matters. It is the layer that turns model capability into a product experience.
A lot of agent failures get blamed on the model, but start in the harness: wrong context, noisy tool output, missing approvals, failed tests that never re-enter the loop, or edits with no record of how they happened.
Those are harness problems.
Why build one from scratch
The best way I know to understand a system is to break it apart, then build the smallest version that still works.
So I built a tiny coding agent harness from scratch.
The full code is in github.com/assimovt/harness-from-scratch. Each step below links to the commit that introduced that part.
Not because everyone should write their own agent framework. Most people should not.
You can learn a lot by reading open-source agent projects. But most of them are already large systems. They include model providers, tool registries, sandboxes, retries, memory, prompts, UI, auth, evals, and deployment.
That is useful if you want to use them. It is harder if you are trying to understand the core concepts.
A small implementation lets you separate the pieces. You can see where context enters, where tools run, where feedback returns, where permissions apply, and where the trace gets written.
Once you can observe those pieces, bigger systems become easier to reason about and build.
There are many open-source tools in this space now. You can look at projects like Codex CLI, Aider, opencode, OpenHands, Cline, and others, and ask better questions:
- what context enters the model?
- what tools can it call?
- how does the loop run?
- how does feedback get returned?
- what actions need approval?
- what gets traced?
What we are building
This post builds a tiny local coding-agent harness.
Not a framework. Not a platform. Just enough TypeScript to see the moving parts.
The language is not the point. You could build the same thing in the language you prefer. I used TypeScript because I already use it for most of my work, and because I wanted the code to be easy to read, debug, and change.
The task is deliberately boring: fix a small bug in a todo CLI.
That is on purpose. If the example is too clever, the example becomes the story. I want the harness to be the story.
By the end, the harness can inspect a small repo, choose tool calls, edit a file, run a test, and keep a trace a human can replay.
That is the minimum loop I wanted to understand.
It runs from the command line and gets one user prompt:
Inspect examples/todo-cli, fix the failing test, run the tests, and summarize what changed.The prompt asks for a summary because a coding agent should tell the human what changed and how it checked the work.
This tiny version stops one layer earlier: it writes a trace, the raw record of what happened during the run. A user-facing summary can be generated from that trace later.
The first version does not call a real model. It uses a mock model instead.
That keeps the harness easier to debug. If the run fails, the problem is in the harness, not in a live model response.
Later, I can replace the mock with a real model adapter without changing the harness loop.
I will link to the exact commit for each step as we go.
The repo pieces that matter are:
src/
  index.ts
  model.ts
  tools.ts
  loop.ts
  permissions.ts
  trace.ts

examples/
  todo-cli/
    src/
    test/
Each file maps to a harness concept.
model.tsdefines how model output enters the harness.tools.tsdefines the controlled ways the model can touch the outside world.loop.tsdecides how the model keeps working after each observation.permissions.tsdecides which actions need review.trace.tsrecords what happened.
This is not the only possible design. It is just a small one that makes the concepts easier to see.
The shape of the harness
Before we build, here is the mental model.
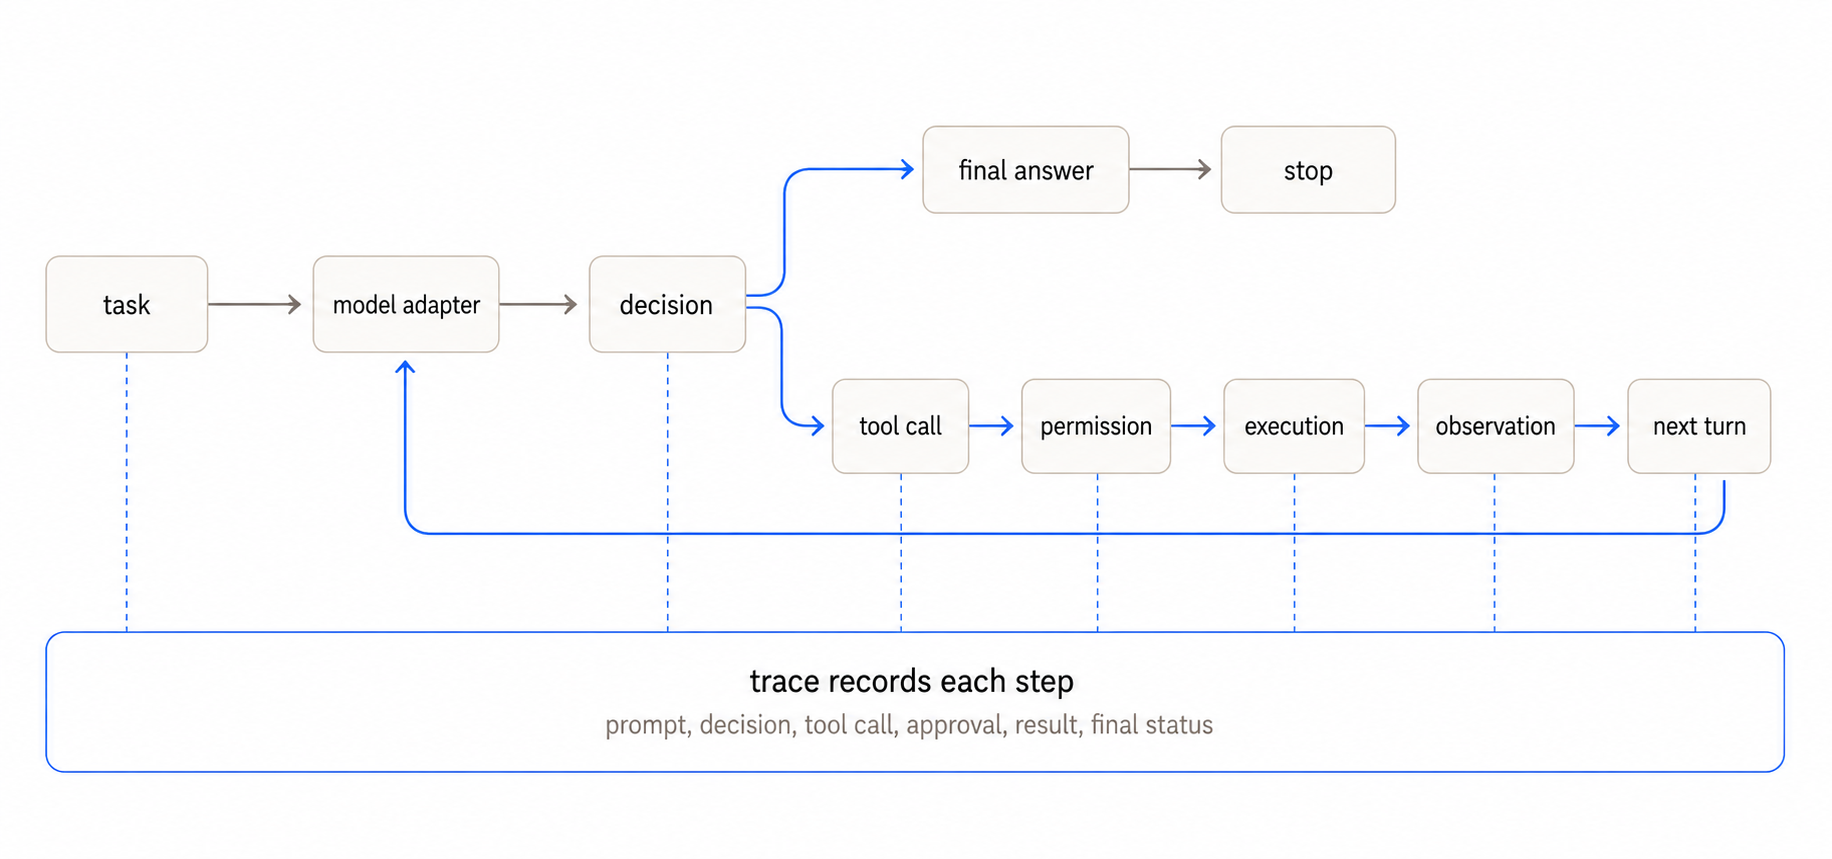
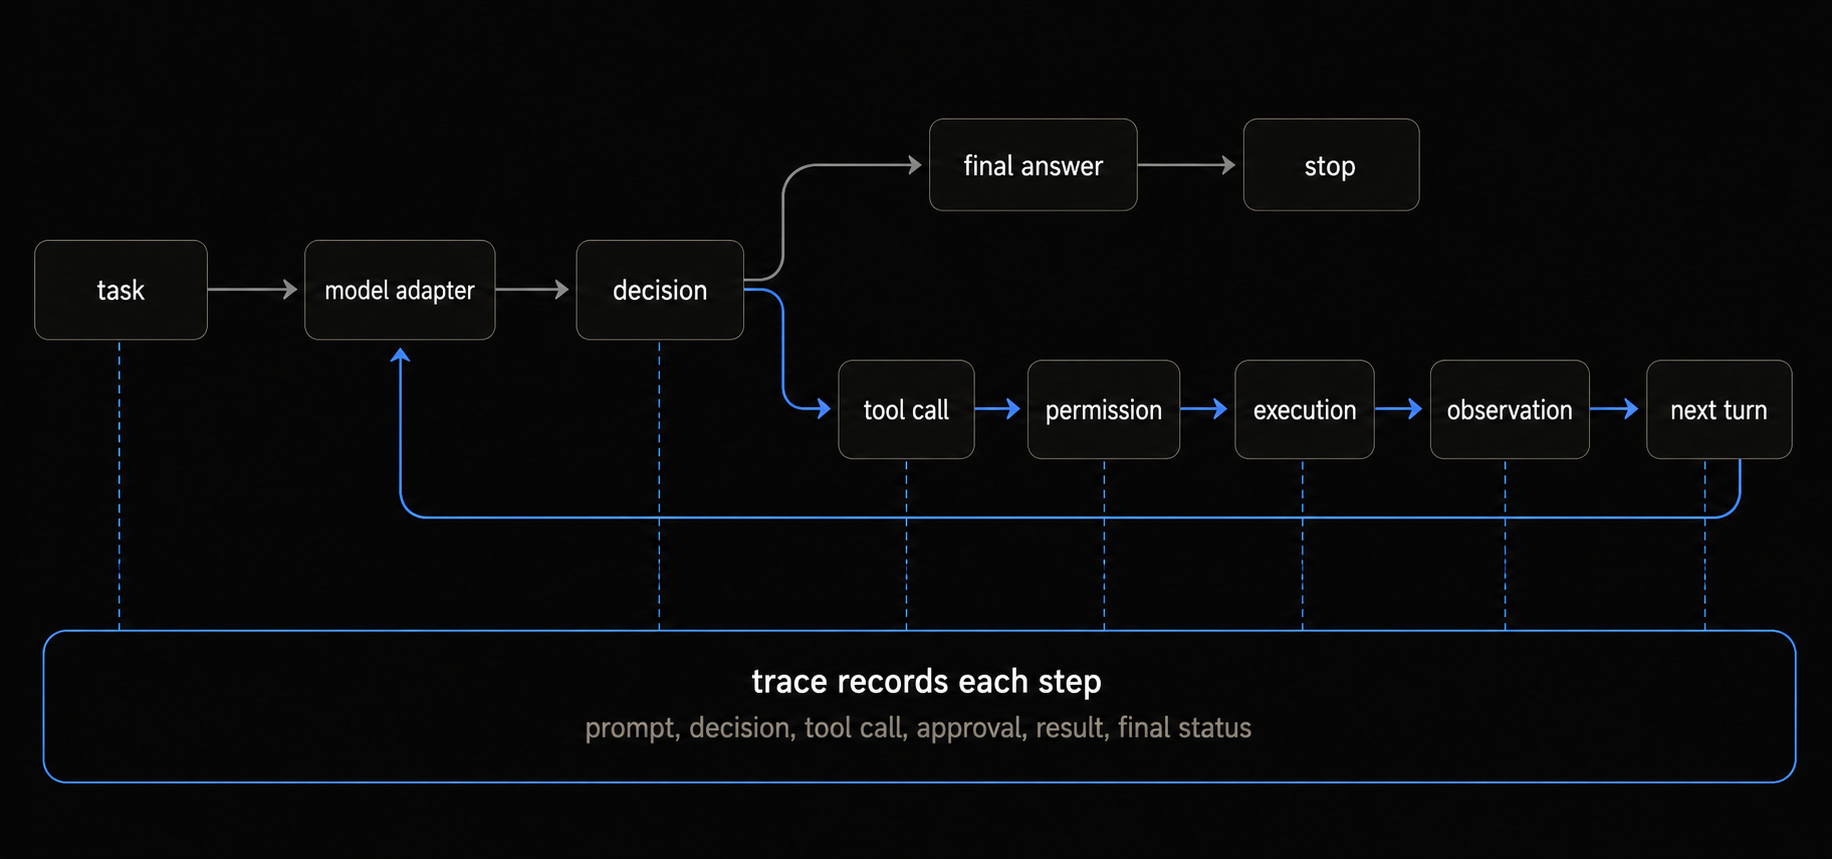
Each part has one job.
The model adapter hides the LLM provider behind one contract. Context is what the model gets to see for the next step. Tools are narrow openings to the outside world. The loop feeds tool results back into the next model call. Permissions decide what can run. The trace records what happened.
I could have defined all of this up front and filled it in. But I went the other direction: build the smallest version of each part, in order, and let each step fail in a way that forces the next part to exist.
Step 0: Start with a tiny app
Code for this step: 4bc6cbf
The first thing I needed was not a model. It was a small target app.
A harness only becomes real when there is something for the model to inspect, change, and verify. Without that constraint, interfaces can look clean while hiding the hard parts: which files can be read, which commands can run, what feedback comes back, and where the workspace boundary is.
So I made a tiny todo CLI.
It has one bug: Completed todos still show up in the active list.
The failing test makes the bug visible:
# Subtest: listActiveTodos removes completed todos
not ok 1 - listActiveTodos removes completed todos
error: |-
  Expected values to be strictly deep-equal:

+ actual - expected

    [
      {
        completed: false,
        title: 'Write harness post'
      },
      {
+       completed: true,
+       title: 'Ship old prototype'
+     },
+     {
        completed: false,
        title: 'Record trace demo'
      }
    ]
This is a good first task because the domain is obvious and the failure is concrete. No API, database, or UI needed.
It gives the harness the basics:
- source files to inspect
- a test to run
- a bug to fix
- output to learn from
It also introduces the first harness concept: scope.
In this version, scope means the workspace boundary. The workspace is examples/todo-cli. The harness may read and edit inside that directory, but it should not wander through the rest of my computer. That boundary is part of the product.
Step 1: Give the model a contract
Code for this step: 0efbcd9
After the todo fixture, I added the first model adapter. Still no real model. Just a mock.
This step is about the shape of model output.
In a chat UI, the model can return a paragraph. That is fine because the human decides what to do next.
In a harness, the software is the runtime. It needs to decide what happens next.
So the model can’t only “say something.” It needs to return a decision the harness can understand.
For now, I used two decision types:
type AgentDecision =
  | {
      type: "tool_call";
      tool: string;
      input: unknown;
      reason: string;
    }
  | {
      type: "final_answer";
      summary: string;
    };
Now the harness has a contract. The model can either ask to call a tool or stop.
The rest of the harness can be built around that shape. It can validate a tool call, execute it, trace the decision, reject unknown tools, and stop when the model returns a final answer.
The mock model currently returns:
{
  "type": "final_answer",
  "summary": "I can describe a likely fix, but I cannot inspect or change the repo yet.\nTask: Inspect examples/todo-cli, fix the failing test, run the tests, and summarize what changed.\nMissing harness parts: tools, loop, feedback, permissions, traces, and final summary."
}
This output is intentionally unsatisfying. It tells us what is missing.
The model can describe the likely shape of the work, but it has no way to do the work. It can’t inspect todos.js. It can’t read the test, edit the bug, or run the command. It can’t see whether the test passed.
The model could reason about the bug, but it had no working environment around it yet. That is the difference between model intelligence and agent behavior.
Why fake the model at all?
Because at this stage, I want failures to be boring. If the mock returns a known decision and the harness can’t handle it, the harness is wrong.
A real model adds more variables: prompt quality, structured output, tool choice, parsing, and provider behavior. Those matter later. Step one is about the harness boundary.
The mock gives me a predictable model replacement while I build that boundary.
The design choice that makes this work is that the harness depends on ModelAdapter, not a specific model API.
Real model APIs can return structured outputs or tool calls. The adapter turns those provider-specific responses into the AgentDecision shape the harness understands.
The provider should be replaceable. The harness should own the workflow.
Step 2: Give the model eyes
Code for this step: 437f075
At this point the harness had a model decision contract, but the model still could not see the repo.
For a coding task, the first useful capability is usually reading. What files are in the project? What does the test say? Where might the bug live?
So I added two read-only tools:
listFiles
readFile
This is the first time the harness gives the model access to the outside world.
But it does not give the model direct filesystem access. It gives the model a named action with an input shape, an output shape, and boundaries the harness controls.
For example:
{
  "type": "tool_call",
  "tool": "listFiles",
  "input": {
    "path": "."
  },
  "reason": "I need to see the repo shape before choosing which file to inspect."
}
The harness receives that request and decides what to do.
It checks whether listFiles is a known tool.
It checks that the requested path stays inside the workdir.
It skips directories like node_modules and .git.
It truncates output so a tool result cannot flood the model context.
Then it returns a result:
{
  "ok": true,
  "output": "README.md\npackage.json\nsrc/\nsrc/commands.js\nsrc/todos.js\ntest/\ntest/todos.test.js"
}
The model can now see the shape of the todo project. It still cannot change anything.
That split matters. Reading and writing are different risk levels. Reading a file can leak context. Writing a file can change the system. Running a command can do almost anything.
That power is why tools need guardrails. The first ones here are small:
- fixed workdir
- known tool names
- no parent directory paths
- output truncation
- read-only access
Stronger controls come later, when the model gets write access and commands.
A tool gives the model one narrow capability, with a boundary the harness controls.
The model can now see the repo, but it still cannot act on what it sees.
Step 3: Add the loop
Code for this step: e325eea
At this point the harness could execute one tool call. That is useful, but it is still not an agent.
One model call can choose one action. One tool call can return one observation. But real work usually needs more than one step.
The agent needs to look at something, learn from it, choose the next action, learn from that, and keep going until it has enough information or hits a limit.
That is the loop.
The basic loop is simple:
- send the current messages to the model
- get a decision
- if it is a tool call, run the tool
- append the tool result as an observation
- ask the model again
- stop on a final answer or a step limit
This is the same basic shape people often call a ReAct loop: reason about the current state, act through a tool, observe the result, then repeat.
This is where the harness starts to feel different from a chat wrapper.
The model is not just answering the user. It is operating inside a process. Each observation changes what it can do next.
In this version, the mock model follows a fixed path:
It is still scripted. It does not truly reason over the observations yet. The point of this step is to make the loop visible.
- list the files
- read the failing test
- read the likely source file
- stop with a summary
The run looks like this:
step 1
tool: listFiles
reason: I need to see the repo shape before choosing which file to inspect.

step 2
tool: readFile
path: test/todos.test.js
reason: The failing test should define the expected behavior.

step 3
tool: readFile
path: src/todos.js
reason: The failing behavior is probably implemented in the todo domain logic.

step 4
final answer:
I found that listActiveTodos returns every todo, including completed ones. The harness can read the issue now, but it cannot edit files yet.
The important part is what changes between turns.
By turn 3, the model input is no longer only the original prompt. It includes earlier observations:
user task:
Inspect examples/todo-cli, fix the failing test, run the tests, and summarize what changed.

observation from listFiles:
README.md
package.json
src/todos.js
test/todos.test.js

observation from readFile(test/todos.test.js):
expected active todos:
- Write harness post
- Record trace demo
That growing context is what lets the next decision depend on the previous tool result.
This is a small change in code, but a big change in behavior.
Before the loop, the harness could make one move. After the loop, each tool result becomes context for the next model call.
The loop also needs limits. Even this tiny version has a max step count. Without it, a bad model decision could run forever. Later, the loop will need more controls: invalid decision handling, command timeouts, approval pauses, budget limits, and stop conditions.
But the core idea is already here.
An agent is not one model call.
An agent is a model inside a feedback loop.
The harness can diagnose the bug now. It still cannot fix it, because it has no write tool.
Step 4: Give the model hands
Code for this step: d576152
Read tools changed the harness.
The model could inspect the repo, read the failing test, and find the likely bug. But it still could not do the work.
The next step was write access. This is the first risky boundary.
Reading gives the model context. Writing gives it power.
That changes the job of the harness.
Before this point, the harness was mostly moving information between the model and a few safe tools. Once the model can change files, the harness becomes a control system.
It needs to decide whether the action is allowed, where it is allowed, what risk level it has, and what should be recorded for review.
I added one new tool:
writeFileThe input is intentionally simple:
{
  "path": "src/todos.js",
  "content": "..."
}
The tool reuses the same workdir boundary as the read tools. It rejects parent directory paths. It reads the previous file content before writing, then writes the new content.
Capturing previous content matters because the harness has two audiences: the model needs feedback now, and the human needs review later.
If a model edits a file, the harness should make it easy to answer:
- what changed?
- where did it change?
- what was there before?
- why did the model do it?
For now, the permission system is small. It is not a real human approval UI yet.
It is a small policy function:
reviewToolCall(call)Read tools are low risk.
Write tools are medium risk.
Unknown tools are blocked.
For this demo, there is no human approval UI yet. writeFile is approved automatically after the path guard checks the workdir boundary.
That is not enough for a production coding agent, but it is enough to make the permission boundary visible.
The run now reaches a write step:
{
  "type": "tool_call",
  "tool": "writeFile",
  "input": {
    "path": "src/todos.js",
    "content": "export function listActiveTodos(todos) {\n  return todos.filter((todo) => !todo.completed);\n}\n"
  },
  "reason": "listActiveTodos should return only todos where completed is false."
}
Before executing it, the harness prints an approval record:
{
  "type": "approval",
  "approved": true,
  "risk": "medium",
  "reason": "Demo mode approves writes after the path guard checks the workdir boundary."
}
That approval record is primitive, but the shape is important. The harness is making a policy decision before the action runs.
Later, this can become a real approval card in the product UI, like the approval prompts you see in agent CLIs:
- action: write
src/todos.js - reason: fix active todo filtering
- risk: medium
- preview: old content and new content
- options: approve or deny
That is the product surface, not the model call.
The model proposes an action. The harness decides how that action moves through the system: whether it runs, whether a human reviews it, and how much context that human gets.
Permissions are not just security. They are product design.
writeFile previews a bigger problem. If a file write is medium risk, a shell command is high risk. Same idea, more power: the harness gives the model capability through a narrow interface, then wraps that capability with policy and review.
The harness can edit the file now. It still cannot run the tests, so it cannot verify the fix.
Step 5: Add command feedback
Code for this step: 2ac4a08
After writeFile, the harness could change the code. But it still could not know whether the change worked.
Editing is not the same as completing the task. The model can write a plausible fix. It can even write the correct-looking fix.
A fix without feedback is still a guess.
For a coding task, the most useful feedback is often a command. Run the tests. Run the typechecker. Run the linter.
So I added one command tool:
runCommandBut I did not give the model arbitrary shell access. For this version, the command runner allows exactly one command:
pnpm testAnd it runs inside the todo example workdir. That is the narrowest useful version.
The harness captures stdout, stderr, the exit code, and whether the command succeeded. It also has a timeout so the command cannot run forever.
This is the same pattern as the file tools:
- named tool
- small input shape
- fixed boundary
- bounded output
- policy before execution
The model asks:
{
  "type": "tool_call",
  "tool": "runCommand",
  "input": {
    "command": "pnpm test"
  },
  "reason": "The fix needs command feedback before I can say it worked."
}
The harness reviews it:
{
  "type": "approval",
  "approved": true,
  "risk": "medium",
  "reason": "Only the allowlisted test command can run in the harness workdir."
}
Then the command returns feedback:
# Subtest: listActiveTodos removes completed todos
ok 1 - listActiveTodos removes completed todos

# Subtest: renderActiveTodos only shows open work
ok 2 - renderActiveTodos only shows open work

# pass 2
# fail 0
Now the model can stop with a stronger final answer:
I changed listActiveTodos so completed todos are filtered out and verified the todo tests pass.This is the first time the harness completes the full shape of work:
- inspect the repo
- read the test
- read the source
- edit the source
- run the test
- report the result
That is still tiny, but it is different from a chat answer.
The harness did not just ask the model what it thought. It gave the model a way to act, then gave it feedback from the world.
This is why command tools matter so much in CLI coding agents. A shell is often the shortest path from guess to evidence: tests, typechecks, git state, repo search, and project scripts.
It is also risky. Arbitrary shell access would be high risk: it can mutate state, install packages, delete files, or call external services. This demo marks pnpm test as medium risk because it is allowlisted and runs inside the example workdir.
The harness has to decide what kind of shell access is appropriate:
- allowlisted commands
- fixed working directory
- timeout
- output limits
- environment controls
- approval for risky commands
This version only has the first few. That is enough for the teaching harness.
Feedback is what turns generation into work.
The run is visible in terminal output, but it is not durable yet. When the terminal scrolls away, the record of the work is gone. Next the harness needs a trace.
Step 6: Write a trace
Code for this step: 64ff101
At this point the harness could complete the task: inspect files, edit the source, run tests, and stop with a verified answer.
But the record only existed in terminal output. If the run matters, the harness needs durable history.
That history is the trace: the agent’s black box recorder.
The trace is a structured record of the agent run:
- when the run started
- when the model was called
- which tool the model requested
- which approvals were applied
- what the tool returned
- whether the run finished
This is related to what a user sees in a CLI or terminal UI (TUI), but it is not the same thing.
The TUI is the live surface of the run: reading a file, running a command, waiting for approval, tests passed.
The trace is the durable record behind it.
In a real harness, both can come from the same internal event stream. The UI renders selected events for a human watching now. The trace stores selected events so the run can be inspected later.
Neither surface should depend on hidden chain-of-thought. The UI should show operational state and short, user-safe summaries. The trace should record what the harness did.
I added a tiny JSONL trace writer: one JSON object per line, one event per line.
The harness writes it to:
runs/latest.jsonlThat file is ignored by git because it is a run artifact, not source code.
A trace excerpt looks like this:
{"type":"tool_call","tool":"writeFile","input":{"path":"src/todos.js"},"reason":"listActiveTodos should return only todos where completed is false."}
{"type":"approval_requested","tool":"writeFile","risk":"medium"}
{"type":"approval_result","approved":true}
{"type":"tool_result","tool":"writeFile","ok":true,"outputPreview":"wrote src/todos.js\n\nprevious content:\n..."}
{"type":"tool_call","tool":"runCommand","input":{"command":"pnpm test"},"reason":"The fix needs command feedback before I can say it worked."}
{"type":"tool_result","tool":"runCommand","ok":true,"outputPreview":"# pass 2\n# fail 0"}
{"type":"run_finished","status":"finished"}
Without a trace, debugging depends on memory and terminal scrollback. With a trace, I can inspect the run after it finishes.
I can ask:
- did the model read the right files?
- did it run the right command?
- did approvals happen before risky actions?
- did the command actually pass?
- where did the loop stop?
This is also the bridge to the final summary a user would see after the run.
The final_answer.summary from the model is just a model message. A user-facing summary should be built from more than that: files read, files changed, commands run, approvals, tests, final status, risks, and open questions.
I do not build that summary in this version. I stop at the trace.
A UI can turn that record into a human-readable result later. For now, the trace is enough to show the final core concept.
The harness should not only let the model work. It should make the work inspectable.
It is the smallest version that shows the spine of a harness:
model contract -> tools -> loop -> permissions -> feedback -> traceBut it only scratches the surface. Real harnesses need more than this tiny version:
- real model adapters and structured output validation
- richer tools, including shell, browser, MCP servers, IDE APIs, and internal APIs
- better context packing and repo maps
- human approval flows for risky actions
- user-facing summaries and handoff
- traces, metrics, costs, and evals
Each of those pieces is worth exploring on its own.
As models get better, there is more to build around them. Better models make more serious work worth delegating, and more serious work needs better harnesses.
I will keep digging deeper into these areas and share what I learn here. If you want to follow along, I will post new articles and findings on X.
Try it
The code is at github.com/assimovt/harness-from-scratch. To try it:
pnpm run demo:reset
pnpm run demo
The first command restores the failing todo bug. The second runs the full loop: inspect, edit, test, trace.
After the run, open runs/latest.jsonl and replay what the agent did.